
Splatoon 3 Callie Wig Guide: Getting Started

Wanna Super Fresh Callie wig?
Or maybe get an idea on how to make your own Squid kid or Octoling?
Or just have questions about foam wigs in general?
Hopefully this guide helps give you an idea on how to build you own Super Fresh Foam Wig!
Skill Level: Advanced
This guide uses more advanced tools and techniques. Please remember to practice safety precautions when using the tools and materials mentioned in this guide. Seek help when you have questions. And find alterative ways in assembling the headpiece when needed.


TOOLS
Utility/exacto knife
airbrush w/ airbrush components and maintenance equip (ie compressor, cleaning solutions, etc)
wire cutters
Dremel
handheld belt sander w/belt sanders of various grits
MATERIALS

Dremel-Chan says: Remember when using power tools please wear proper safety equipment!
EVA Foam (variety of thickness depends on type of wig you are make - I used 2mm, 5mm, and 10mm EVA foam)
Upholstery Foam (I got two 24in x 36in x 3in Foam for the long tentacles)
Contact Cermet
floral wire
masking tape
plastic wrap
Stretch vinyl (in the colors you need)
Matte finisher
foam clay
dowel rod
Velcro
large sew in snaps

Step 1: PATTERNING
The first step to every cosplay guide is establishing a pattern! Thankfully if you are making a Callie wig - I did a lot of the work already for you and made a bunch of PATTERN GUIDES HERE! Although not every body is the same. So please scale it to you! And obviously if you are working on a completely different character - your pattern will be wildly different but feel free to use this guide as a way to help figure out how to approach foam wig work.
In this step - I will be going in detail exactly what I did for patterning. This includes a overview in making the “bald” cap base for your wig, planning where each foam tentacle “hair piece” goes, and understanding how to scale the pattern to fit you.
This is the most CRITICAL step in the entire process so…
take. your. time. with. this.
Make the Foam Base


don’t forget to ink your base too ;)
Your wig has to sit on something - start with what is essentially a foam wig cap (please note that this doesn’t necessarily replace having to wear a normal wig cap. If you have actual hair on your head…. you will need to wear a wig cap too when wearing a foam wig!).
Grab a friend to help you with this - also grab a wig cap and put your hair up into it just like you would if you were to wear the foam wig for real.
Have your friend wrap your head in plastic wrap
On top of the plastic wrap - use the masking tape to tape where the foam wig will be (and a bit beyond)
Have your friend use a marker to draw the cap’s edges (around forehead, back of head making sure to hide small hairs, around ears)
Mark the FRONT, RIGHT, LEFT, BACK. Since I was doing Callie I also marked where I want the bow to be for reference.
Slide it off your head and you should have your fitted pattern for your foam wig cap base.


Now that you have your tape wig cap - you will want to figure out how to make it a flat pattern
……..so it can be transferred to 2 or 4mm foam!
With mine I cut the tape wig cap into triangles with a central point that goes around the top of the head. Some triangles having little darts. You can see photos of the wig cap above! I provided my actual pattern I used as a REFERENCE in the Reference and Pattern guide. Feel free to use it as a reference to help instruct you how to do yours.
NOTES WHEN MAKING A PATTERNS
Label EVERYTHING (back, side, front, ear, give each piece a number or a letter).
Mark where you want to cut and where pieces need to connect (little reference lines - you can see examples in the reference in the Reference and Pattern guide.)
TAKE A PHOTO of it BEFORE you cut! Its for your own personal reference so you can easily see how things piece together.
When you are ready - go ahead and CUT the Tape Wig Cap! Your objective is to get the pattern flat.
There may be spots that bump up a bit - I typically cut into the bump until it lies flat. Essentially making little darts (kinda like a sewing dart but you don’t need seam allowance).
Now FINALLY you have your flat pattern - transfer it to either 2 or 4mm Foam.
Don’t forget to transfer your labels and markings to help you piece them together! Cut and glue the edges together with contact cement.
Once the glue is dry…Try it on!
make corrections here!
It is 10000% easier to start making corrections earlier on in the patterning process. Ask yourself “does this fit alright?” “Is the wig too tight?” “Too loose?” “does it lineup correctly?” “Are the ear holes in the correct spot and symmetrical?” “Is the shape alright?”
If you are not happy with your foam wig cap - please make adjustments.
When I made my Callie wig I had to make corrections specifically in the back underside so that it was more form fitted to my head (I essentially cut in more darts in the underside back to bring the back in a bit).
I also had to make adjustments to the placement of the ear holes (cut away parts so my actual ears could fit through the ear holes and make corrections of either adding more foam or cutting away foam from the holes so they were symmetrical).

Now that you have your foam wig cap - time to break down the Squid wig ‘Hair’ pieces on top!
I like to make digital guides for myself. It helps me figure out how many pieces to make and the general shape of things. Personally I love referencing 3D Models because I can easily rotate them and see how everything is placed.
For the reference on the left I referred to a Splatoon 2 Callie model since the wig base is essentially the same (the bow and tentacle placement is different in Splatoon 3).
I traced around the outlines of the wig on the 3D model in BLACK INK. Then in RED INK I drew where my head was.
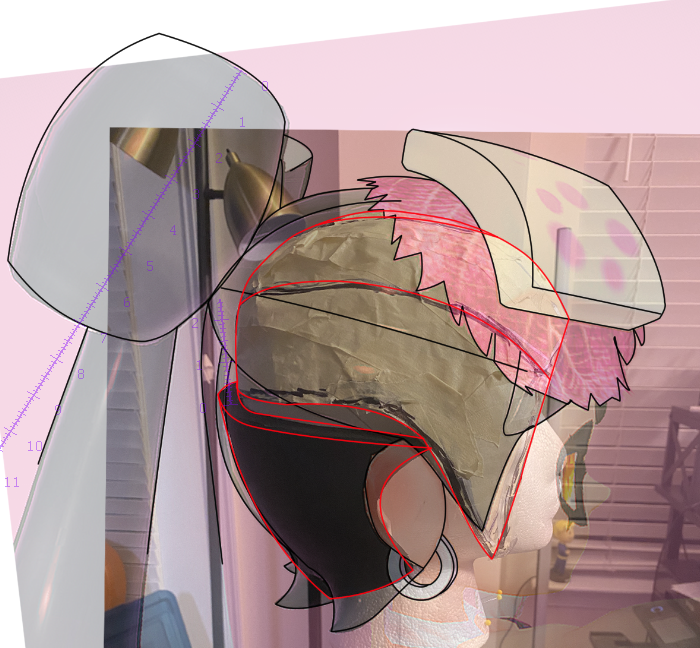
Layers reveal how I know where to place things! You can even take a photo of your own head and place the digitally drawn layer on top so you can see how it should look and scale to a size that works best for you (don’t forget to take measurements of your own head so you know how much you need to scale the image by).
Resize the layers until you get it to match up correctly.
NOTE: I made a lot of adjustments later (like making the bow and the tentacles smaller). This digital reference was just a guide to give me an idea of how it may look.
*it was also for my sanity because oh man are foam wigs complicated when you look at them as a whole! But being able to break the wig down into essentially little banana shapes help make the wig seem not so complicated. Its just a whole lot of bananas xD

See pattern in Google Drive
Once I understood roughly how big one part of the wig should be.. it gave me insight on how big other parts should be as well. So I would grab references from in game, drop them in ClipStudio, scale to how big it needs to be in comparison to my own measurements and finally use the line tool to trace the shape.
When satisfied with the digital pattern ->
Print it out.
See how it looks next to your head.
Make adjustments where needed.
Repeat until it looks Super Fresh!
*don’t forget most characters in media have extremely unrealistic traits. (I mean Callie isn’t even human… You are making a Squid!) So obviously you will need to make changes (width, length, thickness, etc) that would work for you. Careful of things like ‘bobble head syndrome’ (making things so comically big to match a character who has a big head to begin with… same with the other way around with it being too small). Adjust where you need to!

This step can take a whole lot of time…. Luckily for you if you are making a Callie wig (or one similar to it)………
I ALREADY DID MOST OF THE WORK FOR YOU!

Psst…
I revisited patterning several times when I made my wig. I had to constantly make changes to my wig. So if you make a mistake.. no worries! You can always come back to this stage to make changes to your pattern.
See the FREE Pattern Guides!
Be sure to read the file on how to print the pattern.
And know that everyone’s head is different so what might have worked for me … may be different for you so please make adjustments when needed.
And that’s how you get started!
Keep this first part of the tutorial in mind JUST IN CASE you have to come back and make adjustments at any point.