
Splatoon 3 Callie Wig Guide: EVA Foam WIG Basic Construction methods
Got your pattern? - if not then check out the first part of this tutorial HERE!
Yes - you got it? Woomy! - This part of the tutorial will go over techniques for building the foam “hair” pieces. I will specifically talk about how to manipulate foam pieces to get it to bend or look the way you imagined it should be.

STEP 2: EVA FOAM Basic CONSTRUCTION
If you look at the wig as a whole - it may look complicated and overwhelming.
Although if you break it down and only look into each individual layer - it actually becomes a lot simplier to understand.
Its the foam bald cap and just a bunch of weird looking banana and tear shapes stacked on top.
If you are still a little overwhelmed - no worries… I will go over the process I went through when building the EVA foam wig from the bald cap up!
Now I know some of you may be working on other Squids or maybe an Octoling or someone completely different.
So before we get too far ahead of ourselves I want to clarify something important about the types of foam and when to use what foam.
There are Two types of foam that I will be talking about in this tutorial…….
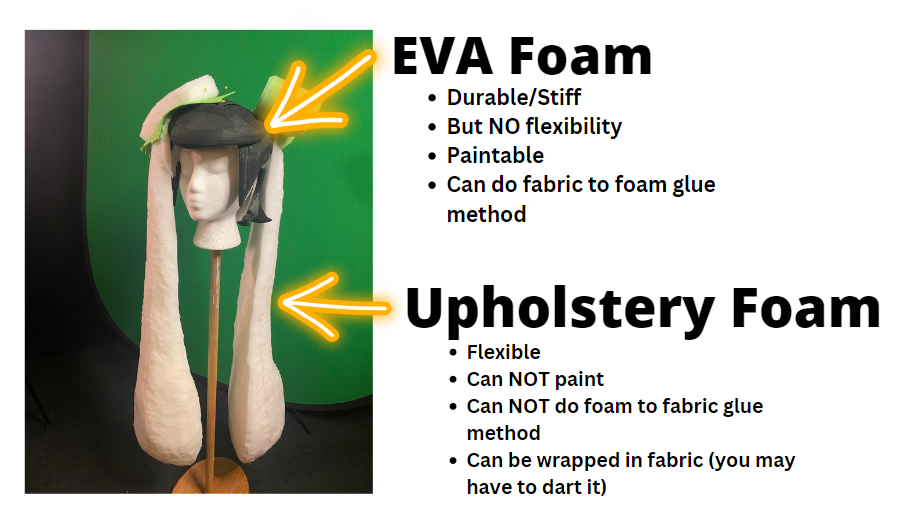
For Callie I did everything out of EVA foam except for the long tentacles (note that in the photo the sponge and the bow are upholstery foam… I later switched to EVA foam because I realized that its impossible to do the glue fabric to foam method on upholstery foam). The tentacles need to be flexible because can you really just imagine trying to sit down with a stiff as a board 3ft tall tentacle ….. yeah I don’t want you to have to experience that either.
Moral of the story….
If the hair piece NEEDS to have movement/flexibility go with the Upholstery foam.
Otherwise EVA Foam is the best way to go.
This part of the tutorial will specifically go over EVA Foam (the Upholstery foam tutorial will be up soon if its not up already).

Start with building the bottom of the wig up with thicker EVA foam.
The Squids/Octolings have some THICK looking tentacles so you will want to build up from your little 2-4mm thick foam wig bald cap. I started with the back bottom half of the wig.
And as I have stated in the previous part of this tutorial… you will be returning to the patterning stage throughout the build. You will use similar techniques that we used in making the tape bald cap from part 1 of the tutorial.
Since this lower part matched the profile that followed the bald cap - I used the bottom half of my foam wig cap pattern and cut out new thicker EVA foam pieces that were slightly larger to accommodate for the fact that I was cutting these pieces out of thicker EVA foam. I used contact cement to attach this thick foam onto the lower back of the foam wig cap (see black foam pieces in right photo).
Remember to FLATTEN YOUR PATTERN WITH DARTS!

Disregard the shape of the headpiece itself in this photo (I did a ton of altering later on to make the wig less egg shaped xD )
But see the darts I have in the bottom part of the foam wig (by where I have the numbers). The more darts, the more I was able to meet the curve of the foam bald cap.
PRO TIP:
When cutting the thicker EVA foam - cut it to be a bit LARGER. Since the foam is much thicker than the paper it will need a bit more length to cover the surface you want it to cover.
Its so much easier to adjust a piece that’s a bit bigger by cutting/sanding foam away instead of having to add more foam or completely remake the piece.
So now that you have the bottom of the wig started - Let’s work on the top half of the wig… I used plastic wrap to cover around my foam bald cap, then made a tape pattern of what I wanted to cover.
Draw the ‘hair’ pieces.
(for Callie it was two symmetrical sides and one top large top piece that was darted to look like 3 pieces in on the top) See the photo below for a rough sketch of what the patterns pretty much looked like.

Cut pattern out and see how it looks on the wig before transferring to foam.

Both side pieces and the large top piece (that essentially forms 3 parts on top) need a rounded shape to them.
So you will need to add another layer on foam on top of the pieces you just cut. You can either use 5mm or higher for this layer of extra thickness.
Use contact cement to adhere the pieces together (remember to read the label on proper safety procedures and how to use if you are unfamiliar with contact cement) or alternatively use another adhesive (ex: hot glue)!
Once the glue is dry its time to round the edges!
PRO TIP:
Before you start sanding…. use an exacto knife to cut a bit from the edges so there is a little less sanding to do (so less foam dust! YAY!).
NOW pull out your dremel and sand those edges down. That way the piece will have a more soft rounded shape to them.
HOLD UP!!!!
Before you go gluing all the pieces onto the foam wig cap….
Try bending the foam banana side piece you just finished sanding…..
Notice how there is way more resistence when you try to bend the piece.
The thicker the foam the more the foam will want to resist when bending. This is a problem because it can make it really hard to get the wig to want to sit right on your head and will make it more difficult for glue to want to hold the foam in the bent state.
I wanted to ease the resistance so that my side hair piece could bend horizontally (from the front of my face to the back side of the wig). So I made many vertical cuts so that when I bent the piece to the desired shape - the piece was able to fold along with the cuts I made (see video above).
NOTE: Careful about the depth of your cuts. Make small cuts first then expand if needed. Its really easy to cut to the otherside or cut so far that it reaches the edge… and that is NOT what we are trying to do. We don’t want to actually see these cuts.
Sooo….. let’s look into how to manipulate the tear drop/banana looking shapes you just made for the top and sides of the wig
…….with some DEEP CUTS!
On the UNDERSIDE of the foam piece you will want to cut grooves (cut about 45° on one side then directly next to it another 45° to create the channel).

You may notice that I also have one long cut going across the side piece in the video up above!
That is the channel I use for FLORAL WIRE!
Naturally your foam piece is not going to want to hold shape. As soon as you let go of your once bent foam piece - it will slowly unroll itself.
How to fix that? Tape in floral wire!
In the long channel I cut a long piece of floral wire. Bend the foam piece with the wire to what I wanted to be. Then used Cosbond Reinforcer Adhesive to tape the wire in place (you can also use gaffer tape or even hot glue if you don’t have any Cosbond).
And BOOYA - your foam piece will now stay in the desired shape!
By the way you will be using all these same techniques for the front bang on the wig! Which go ahead and start making the front bang in the same methods if you haven’t already!
When you have all your base pieces made - see how things will be placed on the wig and when you are satisfied with the look FINALLY GLUE IT the pieces to the foam wig cap!
But what about the little triangles at the bottom of the wig? Or the sponge? Or the bow?
In the NEXT PART of this tutorial I will be going over how to make all the EVA FOAM SCULPTURAL PIECES. Check it out HERE!


